Your Christmas cactus at home is so beautiful. Have you ever thought about how to get some more of them? That's right, through cuttings! Today, I'll give you a detailed guide on how to propagate Christmas cactus, so you can easily grow more beautiful flowers.
Christmas Cactus Cuttings: Replicating Beauty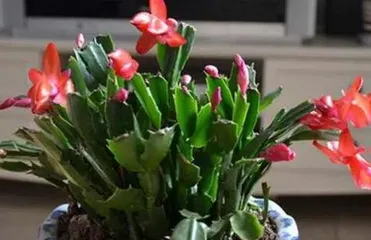
Imagine your Christmas cactus blooming with magnificent flowers, and you want this beauty to continue, allowing more people to enjoy it. Then, Christmas cactus cuttings are your perfect choice. Let's unveil the mystery step by step.
I. Choose the Right Time for Best Results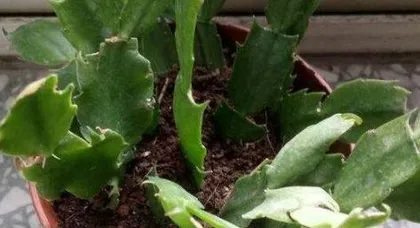
The best time for Christmas cactus cuttings is during the spring and autumn seasons, especially from April to May in spring, and starting from September in autumn. During this time, the weather is mild and the light is suitable, making it perfect for the growth of Christmas cactus.
II. Pick Healthy Cuttings
To ensure successful propagation, the first step is to select healthy and mature Christmas cactus leaves. Typically, we choose the top 2-3 segments of the plant as cuttings. These leaves have a fresh green color and are free from pests and diseases, making them excellent material for propagation.
III. Prepare a Cozy BedYour cuttings need a cozy bed, which is what we call the propagation medium. Perlite, vermiculite, or river sand are all good choices. They have good air permeability and strong drainage, allowing the cuttings to breathe smoothly. Remember, moisten the medium before planting to let them drink plenty of water.
IV. Place the Cuttings in Their BedNow, insert the prepared stem segments into the moist medium, about halfway deep. It's like tucking the cuttings in with a blanket—gently press the soil around them to ensure they are comfortable. After planting, give them a little water to help the soil and the stem segments bond well.
V. The Cuttings' Growth DiaryAfter planting, place the cuttings in a location with bright, indirect light and good ventilation, avoiding direct sunlight. Keep the soil slightly moist, but not waterlogged, or the cuttings might "catch a cold"! After about 3 to 4 weeks, you'll see that the cuttings have started to root!
VI. Care Tips for Christmas Cactus1. Light: Christmas cactus prefers bright, indirect light. Avoid direct sunlight, as it can scorch the leaves! In autumn and winter, you can increase the light exposure slightly to help them bloom.
2. Watering: Keep the soil slightly moist, but avoid waterlogging to prevent root rot. Reduce watering in autumn and winter to stimulate bud growth.
3. Temperature: The ideal growing temperature for Christmas cactus is 15-25°C. Growth is restricted below 10°C or above 30°C. Keep the temperature stable during the blooming period and avoid large temperature fluctuations.
4. Fertilizing: Apply a dilute liquid fertilizer once a month during the growing season to promote plant growth. Increase phosphorus and potassium fertilizer before flowering to help with bud formation and blooming.
5. Pruning: After flowering, promptly remove dead flowers and withered leaves to reduce nutrient consumption and encourage new growth.
6. Short-day treatment: Christmas cactus is a short-day plant. Limiting its daily sunlight to 8-10 hours can promote bud formation.
7. Pests and Diseases: Regularly inspect the plant and deal with any pests or diseases in a timely manner.
By following these steps, you can easily propagate beautiful Christmas cacti! Give it a try and bring more life and vitality to your home!